Account Contacts
- Haris Vagenas
- Panagiotis Papanastasiou
- Oleg Melnykov (Deactivated)
One of the facilities offered by the BSS platform is to host Contacts for all Accounts/Customers. An account contact is an entity that represents a person and is used by the system to support various operations. Accounts can have as many contacts as needed.
Creating a Contact
There are three approaches in which BSS users can create contacts inside the BSS platform. Please, have a look at all three tabs that follow which depict these three approaches:
Basic Contact Entity Fields
In this section of the Contact entity, the user fills in general information about the contact.
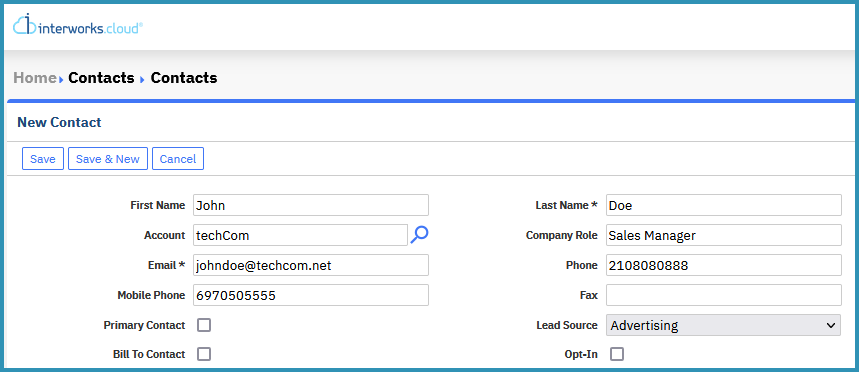
- First Name: The name of the contact.
- Last Name*: The surname of the contact.
- Account: The account on which the contact is linked to, is displayed here. A contact can be switched between accounts, if necessary.
- Company Role: The role that this contact has within the company.
- Email*: The contact's email is mandatory, unique and also acts as the username of the contact, for the Storefront login, if the contact has enabled the storefront access.
- Phone: The contact's phone number.
- Mobile Phone: The contact's mobile phone number.
- Fax: The contact's fax number.
- Primary Contact (checkbox): By enabling this option this particular contact will be the Primary and most important contact for the BSS, concerning the Account/Customer.
- Lead Source: This option specifies the mean by which this 'lead' has come in contact with your company.
- Bill To Contact: This indicates that the contact will also be the 'Bill to Contact'. 'Bill to Contact' means that this contact will be receiving the invoices that are generated by the platform every month, so a contact as such could be for example the finance department manager. This contact is usually configured to receive invoice notifications automatically via email from the platform, as a best practice.
- Opt-In: This option provides the users consent of using their personal data for receiving communication about offers and new services via email. When a user has provided his consent of using his personal data by self-registering from within the Storefront/Marketplace, then in his Contact's Opt-In field there will be a green-colored checkmark. Otherwise, when a Contact is being created via the BSS platform and the Opt-In option is checked, that means that the Customer has obtained the Contact's consent.
Access Options
In this section of the Contact entity, the user chooses the 'Responsible User' for the contact as well as the responsible user's 'Permission Rules'.

- Responsible User*: This option sets the BSS user responsible for the specific contact, which means that a responsible user for an account is usually the same user for the contacts under that particular account.
- Permission Rule: This rights and permissions option of the Contact entity, sets the level of interactivity BSS users (other than the Responsible User) can have with the Contact, depending on the permission rule that they belong to. For example, a default permission rule such as the 'Common All', provides the users (belonging to that rule) with the access level rights to: read, write and delete content from the Contact. However, a different more restrictive permission rule, designed for other users, might be chosen in order to allow only read rights to those users. If you don't set up a new permission rule, only the 'Responsible User' will have access to the Contact.
Enabling Storefront User for a Contact
A Storefront User is considered a user who has full access rights to your Storefront/Marketplace and can submit orders, monitor the subscriptions and assets of the account as well as the billing and invoicing information, edit subscriptions, and create support cases via the submission of support tickets.
Storefront Contact - Allowance Option
In this section of the Contact entity, the BSS user chooses whether the contact will have Storefront access and sets up the date format and the language for the contact.

2. Choose the preferred 'Date Format*' to be assigned for the storefront user contact from amongst the provided options within the drop-down list.


4. The 'User Type' field displays the contacts Role-Based Access Control user type that will always have the value Admin since this contact is enabled as a Storefront user via the BSS.

For more information regarding the Role-Based Access Control, please continue on the RBAC section of this page.
After you have saved the contact, with the 'Storefront User' checkbox enabled, the platform dispatches immediately an email named 'Storefront account activation' towards the contact's provided email in order for the Contact to click the activation link within the email and at the same time provide his preferred password as well as activate his Storefront-user account.
Since more than one Contacts can be configured as a Storefront user, it is important to understand that all contacts that are configured as Storefront users have the exact same Admin access rights. Those access rights are NOT editable from the BSS. For more information please continue to the following section of this page, named Role-Based Access Control (RBAC).
Role-Based Access Control (RBAC) for Storefront Users
Since the introduction of the RBAC for Storefront users, the BSS was also affected. Consequently, once a new contact with a Storefront user allowance is created via the BSS platform, the Admin Role will be instantly assigned to that user. The BSS user cannot change the Storefront user’s user type to a Simple User. Only the Admin Storefront users are able to do so because the functionality of adding new Simple Users and assigning roles, is only available to the Storefront Admin user.
The BSS user, that has the permissions for accounts and contacts, is able to add multiple contacts and Storefront users (Admin Storefront users) and can deactivate and delete any Storefront user.
Changes in BSS Due to the RBAC
Due to the added functionality of the RBAC in Storefront, certain BSS elements in a section of the Accounts view page has been slightly changed.
More specifically, on the view page of Accounts, the Contacts & Storefront Users section one existing column has changed and a new column has been added to incorporate the RBAC changes.
Those columns are the Company Role (previously known as Role), where the role(s) of each Storefront user are displayed, namely: Billing Agent, Subscriptions Manager, Buyer, Cloud Administrator, My Storefront Manager, or Multi-Role (for Depicting more than one role) and the User Type, where the User Type of each Storefront user is displayed, with values: - (dash) (for no Storefront user), Admin (for Admin Storefront users), and User (for Simple Storefront users).

The aforementioned roles and user types have been also added as merge fields to reports, notifications, and in the Advanced Search functionality of the BSS.
Lastly, from the Add Storefront User button, the BSS user has the choice of either creating a new Storefront user or giving Storefront access to an existing contact.
For more information regarding the new Role-Based Access Control functionality in the Storefront, please continue to the Role-Based Access for Storefront Users page.
Sending Storefront Credentials
When a Contact is created in the platform and it has also been defined as a Storefront user, you have also the option of sending the credentials to the contact automatically, via a welcoming email (previously provided in the 'Basic Contact Information'), in which the user can proceed with the finalization of his Contact by creating his own Storefront password.
In cases where either the first 'Storefront account activation' email hasn't reached the contact's email or the activation link within the 'Storefront account activation' email has expired, we offer the option of re-sending the activation email via the 'Send Storefront Credentials' shortcut's option.
Locate the contact (Office → Contacts). From the 'Shortcuts' menu on the left click on the 'Send Activation Link' option.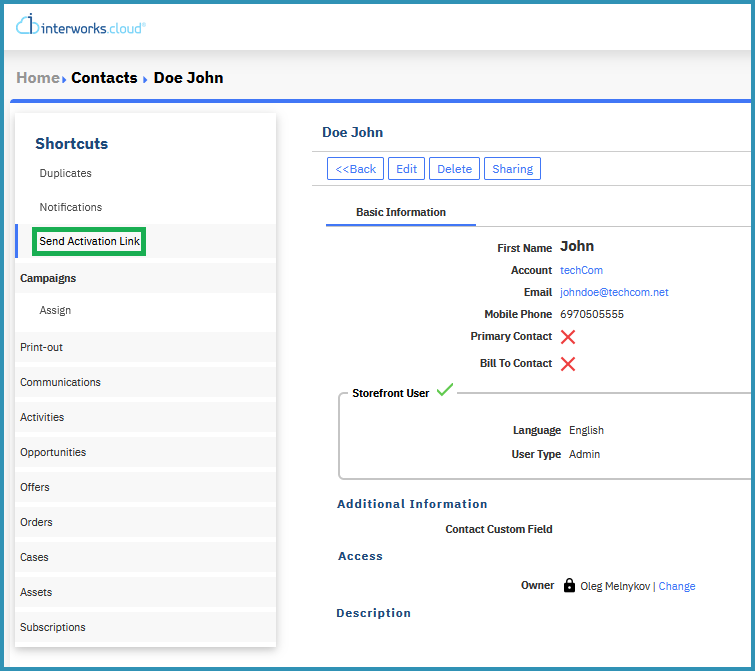
Upon clicking the 'Send Storefront Credentials' option, an email is dispatched containing a link to Activate your Storefront/Marketplace user by also allowing you to provide your own password. You can find and alter the specific email within the Notifications' section of the BSS Setup, under the name 'Storefront account activation'.
Resetting Storefront Password
After the successful creation of the user's password, the Shortcut's menu option named 'Send Storefront Credentials' has now changed to 'Reset Password'.
In cases where the contact wishes to reset its Storefront password not via the Storefront but from within the BSS, we offer the 'Reset Password' option via the contact's shortcuts.
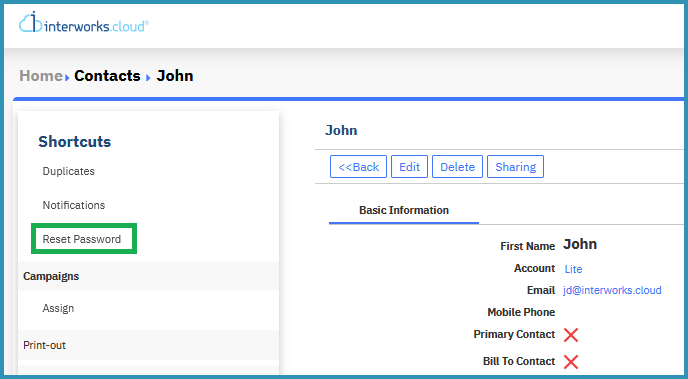
To initiate the process of resetting the Contact's password all you have to do is click the 'Reset Password' option.
Upon clicking the 'Reset Password' option, an email is dispatched containing a link to Reset your Storefront/Marketplace user password.You can find and alter the specific email within the Notifications' section of the BSS Setup, under the name 'Storefront user password reset'.
Storefront User's "Login Options" Information
The Login Options section on Storefront allows users to connect their external authentication provider accounts with their Storefront account. This information is also available on BSS and more specifically on the BSS Contact's view page. When a BSS Contact is enabled as a Storefront user, then inside that Contact's details page, under the "Storefront User" section a field will appear that contains all the activated Storefront login options of the Storefront user.
There are certain cases where the field is visible or not visible and may contain only the "local" login option or other external identity providers (IdPs). Let's briefly examine such cases:
- There is only one Login Option available on Storefront: In the case that the Storefront has only one Login Option for the user, either local login or an external IdP, the "Login Option" field is not displayed.

- There are two Login Options available on Storefront and the Storefront user is connected to one IdP: In this case, the user is connected for example to Azure AD.

There are two Login Options available on Storefront and the Storefront user is connected with the local login as well as one IdP: In this case, the user is connected to local login and Azure AD as the external identity provider.

There are more than two Login Options available on Storefront and the Storefront user is connected with two or more IdPs: In this case, the user is connected to two external identity providers; Azure AD and Okta.

There are three Login Options available on Storefront, but one Login Option is hidden and the Storefront user is connected to one available Login Option as well as one that is now hidden: A Storefront user is connected to both local login and Azure AD both available on Storefront but that user is not connected to the third Login Option.

Storefront User - Creation Difference Between BSS & Storefront.
The main difference of Storefront User Creation between the BSS and the Storefront is that in BSS the first dispatched email contains a link so that the Contact-user can Activate his Storefront-user by also providing his preferred password, whereas the first email dispatched when a Contact-user has self-registered inside the Storefront via the registration form, will contain just an Activation link because, when a user self-registers, the password is provided directly by the user during the form's fill out. Lastly, the second email that the Contact-user receives is common in both cases and it contains the message that the Activation was successful.