Manage Accounts
- Panagiotis Papanastasiou
An Account is one of the most essential elements of the BSS platform and as such it is important to understand the different ways of interacting with it fast and with ease during your everyday use of the platform.
List of Accounts
Upon choosing the 'Accounts' option from the Main Menu, under the 'Office' tab, you are being introduced to a list-view of all your accounts called 'List of Accounts' that has 2 distinct types of views that you can choose from, in the form of tabs, which are namely:
- Detailed View
- List View
Distinction of Accounts' Views
In the Detailed View tab you are provided with more information and tools for every Account, whereas in List View you are provided with the bare minimum information and some basic options to interact with an Account.
The following analysis explains what are the available options, features, and tools found in each of the 2 Views and how you can interact with them to achieve the best possible results with each and every aspect of your Accounts within the BSS platform. Please, have a look at both tabs that follow which depict these 2 Views:
Interactive Options & Filters
From both views of your Accounts, you are provided with some tools in the form of basic options, view filters and folder grouping representation to simplify the process of finding any Account as fast as possible.
List of Accounts - Main Options
Within the 'List of Accounts' on the top left corner of all list Views, you will find a set of some basic options with which you can interact with the Accounts and the Views in a broader fashion.
|
→ Move an account inside a folder (created by you) for organizational purposes, (please see also: 'List of Accounts - Sidebar Collapsible Arrow') → Administer bulk permissions (to all or a selected account), → Assign (all or a selected account) to certain notifications plans and → Export the results depicted on the current View (tab) that you observe in a variety of forms such as: XLS (Excel), TXT, CSV, PDF, DOC (Word). |

List of Accounts - Folder Based Grouping & Categorization Object
Another significant filtering functionality, located within the 'List of Accounts' on the top left corner beside all list Views, is a 'Folder Based Grouping & Categorization Object' that based on your needs of categorizing your Accounts by type (such as Simple Customers, Provisioned Customers and more), can depict those foldered groups so that the end results of the list/View you are observing will portray only the Accounts of a particular folder.
Therefore, this object is yet another way of simplifying your search process of Accounts, based always on your categorization preferences, and can be accessed by clicking the sidebar collapsible arrow highlighted by the blue rectangle.

To create your own Folders (inside the object) for grouping types of Accounts, during the edit or creation of an Account, you can click the button ![]() besides the field called 'Folder', as demonstrated below, and either create a 'New Folder' (within the pop-up window that appears) or add the Account to an existing folder (found inside the pop-up window).
besides the field called 'Folder', as demonstrated below, and either create a 'New Folder' (within the pop-up window that appears) or add the Account to an existing folder (found inside the pop-up window).
|
|


List of Accounts - Alphabetical Listing
The conclusive filtering tool situated inside the 'List of Accounts' page is the 'Alphabetical Listing' filter found beneath both Views' tabs.
This filtering tool provides you with the ability to rearrange and display the end results, of any View, according to the first letter of the name of all your Accounts, to filter out those Accounts that are irrelevant due to different first-letter names.

The filtering options include the letters from 'A' to 'Z' as well as the option 'All'. The last option, as its naming suggests, displays all the Accounts within the list-View, by cancelling all other alphabetical filters.
Account Page - Management
The following analysis explains the aspects of managing the options, menus, and functions of an Account inside the BSS platform, as well as clarifies the options, and the objects found on each sector of the Account page.
Account - Shortcuts Menu
The 1st of the 3 main sectors of the Account page is populated by the Shortcuts Menu, located on the left part of the page. The Shortcuts Menu includes all the actions that can be performed for an Account and it also displays all the linked items (BSS platform objects) for this Account.
|
- Real Case Example: Let's assume an invoice is automatically generated on the 15th of each month and the billing period is for 30 days so it is renewed every 15th of each month. Then if you generate an invoice on the 13th of June, the invoice will be generated manually due to your request and the billing for the period between 15th of May and 15th of June will be displayed normally inside the invoice like it would have been if it was generated automatically. This means that the billing period remains intact, even though the invoice was generated earlier.
|

Except for the Shortcut's Menu, some shortcut objects are also displayed in detail, in each corresponding section of the Account's page at the 2nd main sector, located in the middle of the page.
*Account Synchronization Options
As previously mentioned, in the previous section of this page, the Synchronization option, from the shortcuts menu, provides a list of all the active and inactive cloud services that the Account has access to and therefore is synchronized with.
Each cloud service has the option to see and configure its Sync Options.
Moreover, under each active non-Microsoft cloud service you can find the respective fields and options addressed to each cloud service (since each one usually has different fields) but one field named Vendor Account ID is common to all of them.
This field appears only when the Account is synchronized to a cloud service provider via the respective service manager in BSS, and contains the unique identifier that the cloud service provider assigns automatically to that BSS Account after the first successful synchronization.

The Vendor Account ID field has the following properties:
- It is automatically populated when the first synchronization of the BSS Account with a non-Microsoft cloud service provider is successful.
It is not editable since it is a read-only field, but the BSS user can copy the value of the field, via the copy button.
More sync options and status details of the synchronization can be found on each cloud service, other than Microsoft's.
Account - Name (Current Plan of Reseller Accounts)
The Account Name, located at the first main sector, provides you with the name of the account in the case of a customer.
However, in the case of resellers, it also provides the current plan of the reseller, in the form of a tag. Specifically there are currently two reseller plans, namely:
- The PLAN | BASIC tag: indicating the lite/basic resellers,

For more information regarding the Basic Resellers, please check the Basic Resellers page. - And the PLAN | STANDARD tag: indicating the Standard Edition resellers.

For more information regarding the Standard Edition Resellers, please check the Managing Resellers in the Free or Standard Plan page.
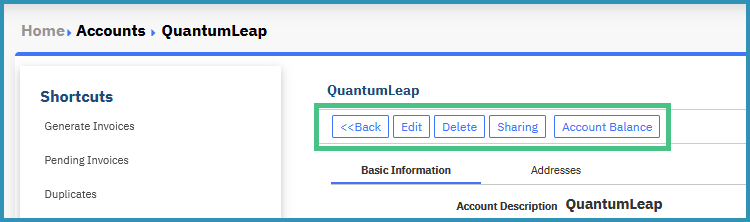
Account - Main Menu
The Account 'Main Menu', located at the top of the 2nd main sector, provides you with the options to go back to the Manage Accounts#ListViewMain, 'Edit' the Account, 'Delete' the Account, Share the account with other users or group(s) of users (providing the same or different permission rules) and depict a detailed overview list of the 'Account Balance'.
Account - Billing Information
The 3rd and final main sector of the Account page is populated by the 'Billing Information' of the Account, located in the right part of the page.
'Billing' is a gauge that provides a snapshot-like representation of the most crucial financial information of the Account.
|
|
