Versions Compared
Key
- This line was added.
- This line was removed.
- Formatting was changed.
| Excerpt |
|---|
interworks.cloud platform can address the issue of collecting feedback from customers in the form of incidents, or tickets, and facilitate the incident, internal life-cycle, management. This can be achieved through the dedicated 'Support' module, which can be enabled as an addon on various interworks.cloud platform editions. On this page, we will describe the feature and provide adequate information for configuring the module. |
Acquiring the 'Support' Module
This page shows the addon availability per interworks.cloud edition. In order to check the options for enabling the module you should consult with your interworks.cloud account manager!
What Happens When you Activate the Support Module
When the 'Support' module is enabled, the respective facilities are available on BSS and Storefront:
A. On your BSS, at the module bar, you will see the Support section.
 Image Removed
 Image Added
B. On the Storefront, after logging in, your customers will see the Support page section.
 Image Removed
 Image Added
Submitting a Ticket
Your customers have two ways to submit tickets to you. The first is to use the Support option on the Storefront. The other is to send an email to a specific email address which is configured for this purpose.
Submitting a Ticket Through Storefront
- The customer logs in the Storefront and clicks on the 'Support' option option.
 Image Removed
 Image Added
 - The customer clicks on the 'Submit'.
 Image Removed
 Image Added
 - The customer fills in the ticket details on the screen and clicks the 'Submit Ticket' button
- Subject: the ticket subject
- Description: the detailed description of the issue
- Service: if the ticket concerns an existing subscription of the customer, they can select it here
- Phone: a contact phone of the customer's responsible person for the ticket
- Email: an email of the customer's responsible person for the ticket
- Attachment: the customer can attach a file that contains useful information
 Image Removed
 Image Added
 - The system confirms the reception of the ticket and displays the code for future reference.
 Image Removed
 Image Added
 - The Support page now contains the new ticket information.
 Image Removed
 Image Added
 - At BSS, a new 'case' has been created! You can access it at Support > Cases.
 Image Removed
 Image Added
Submitting a Ticket Through Email
If your customers prefer to open tickets from their email inboxes, you can enable email requests by setting up in Cloud BSS a support email account. A customer then can submit a ticket by sending an email to your support email account (e.g. support@mycompany.com) and these emails will be automatically transformed to cases.
For enabling this functionality you must do the following:
Email Configuration
Your support email account must be defined from the BSS User that will be by default the responsible user of the support cases. If you don't want an existing user to be the responsible user for all your cases, you can create a new user in BSS that will "represent" your support queue. This user must login to BSS and go to Communications section and setup the support email account:
- Log in BSS and navigate to Office > Communications.
 Image Removed
 Image Added
 - Click on 'Email Options'.
 Image Removed
 Image Added
 - Select 'New Email Account'.
 Image Removed
 Image Added
 - Fill in the required fields.
 Image Removed
 Image Added
 Image Removed
 Image Added
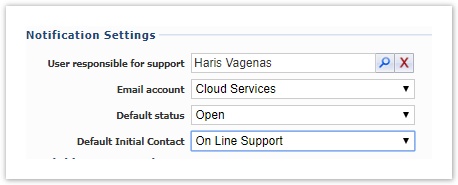
 - Now that you have defined in Cloud BSS your support email account, the next step is to instruct the system to transform the emails sent to this account to cases. Navigate to BSS Setup > Administration> System Options > Organization Profile > Notification Settings and configure the support panel accordingly:
- User responsible for support: The BSS user that was used to create the email account
- Email account: the email account that was created for support
- Default status: The starting status for a newly created ticket
- Default initial contact: Information about the origin of the ticket.

- Click 'Save'.
Ticket Creation through Email
The customer sends an email to the 'Support' email address. The system will create a ticket automatically.
You can access the ticket at BSS, at Support > Cases. Image Removed
 Image Added
| Rw ui textbox macro | ||
|---|---|---|
| ||
The new ticket will get linked to the Customer Account automatically as long as the email has been sent from the email of the customer's contact! Otherwise, a BSS user will need to link the email to the account! |
Table of Contents
| Table of Contents | ||
|---|---|---|
|