A time-saving capability that is offered from the interworks.cloud platform concerning the reports, is the creation of automatically generated reports based on a predefined schedule that you can set. You can utilize this new report scheduling and auto-generate feature, either when you are creating a new report or you wish to auto-generate an existing report. By scheduling a report to be generated at a later date the interworks.cloud platform generates those reports in recurring periods predefined by you and is able to either store them and even send them towards one or more email addresses that you specify during its initialization and setup process. The following guide provides you with the steps to create your scheduled reports as well as manage them.
| Rw ui textbox macro | ||||||
|---|---|---|---|---|---|---|
| ||||||
Necessary Step for Enabling the Report Scheduler To be able to utilize the Report Scheduler you will have to have a saved report. The "Report Scheduler" button will be enabled, only when this condition is met. During the creation of a new report, you can save it after you have finished configuring the "Step 2" without the need to complete all the following steps. |
Setting Up a Report Scheduler
The guide that follows analyzes the steps for locating and configuring the Report Scheduler component in details.
- To begin setting up a "Report Scheduler" you must navigate to the main menu Reports(tab) → Reports(option).
Then you can choose to Edit an existing report from the Report's List, as highlighted in green.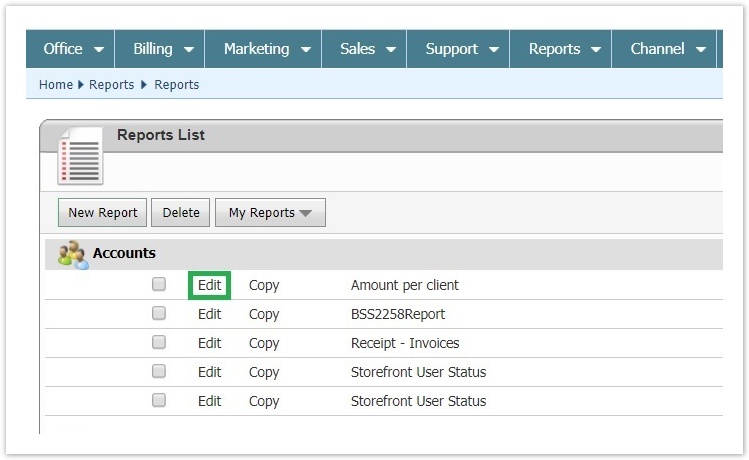
- You will be redirected to the report's page, in which the button Report Scheduler will be now Enabled.
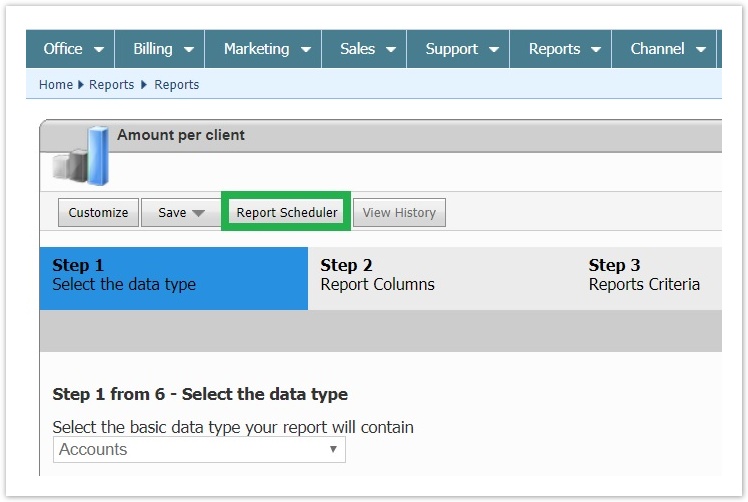
Upon clicking the enabled Report Scheduler button, a pop-up window appears in which the actual scheduler can be configured, for that particular report.
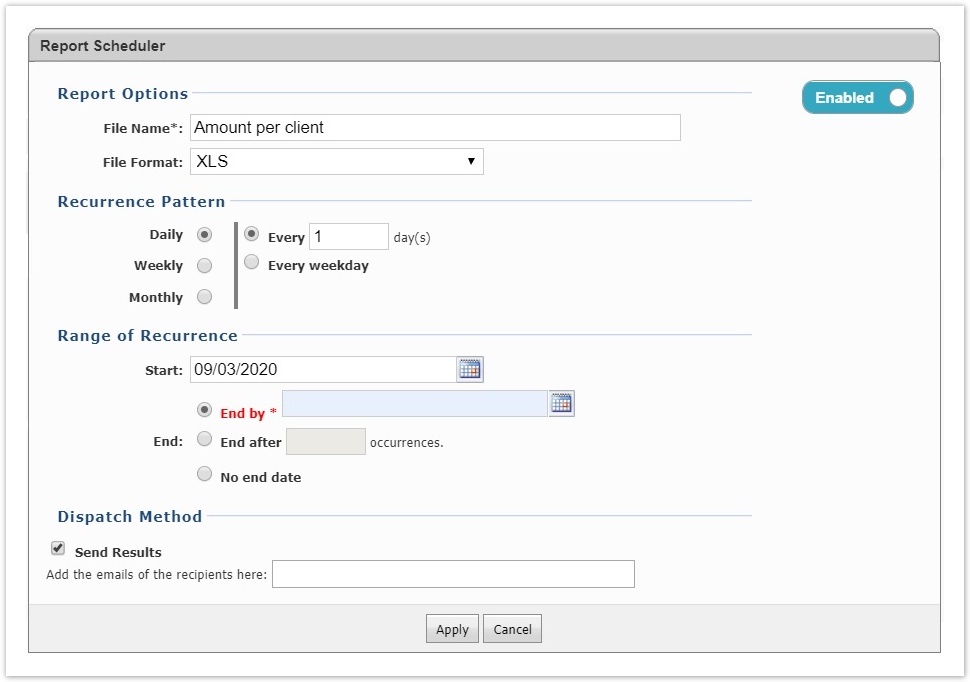
- Report Options: This section of the scheduler is where you provide the report's basic required information such as the report's name and file format, as analyzed below.
- Enable-Disable (toggle button): This button enables or disables the scheduler for that particular report. The button will be activated once you open the scheduler for the first time and its default state is set to "Enable". Once this button is clicked (and moved to Disable state), the scheduler is deactivated immediately, meaning that no report will be created automatically. The values inside the scheduler are kept and you are able to edit them even though the Scheduler has been disabled.
- File Name*(compulsory field):This field will contain the name of the scheduled report. By editing an existing report, the name field will be filled automatically with the name of that report. The name defined here, does not affect the pre-existing report's name, during the edit. (Special characters and number are accepted inside the field but they will be replaced with an underscore "_".)
- File Format: This drop down menu contains the file format options from which you can choose to either generate the scheduled report as XLS or as CSV. The default value is XLS.
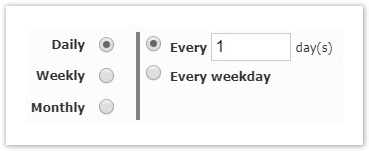
- Recurrence Pattern: This section of the scheduler is where the repetition will be configured, where the radio buttons mean that only one kind of pattern can be selected, either Daily, Weekly or Monthly.
- Daily (Range is: 1-31): The repetition can be configured based on a daily pattern, i.e. once every day. The default value is one day.
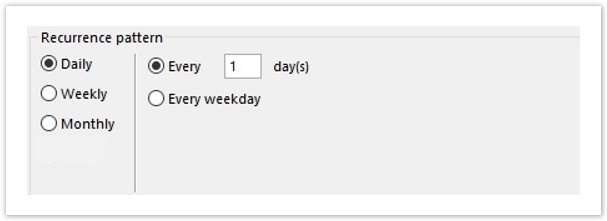
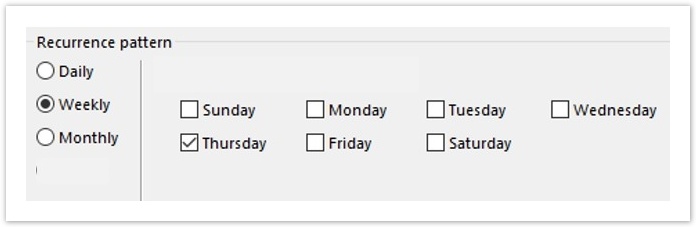
- Weekly: The repetition can be configured based on a Weekly pattern, i.e. every Thursday of every week. The default value is Monday.
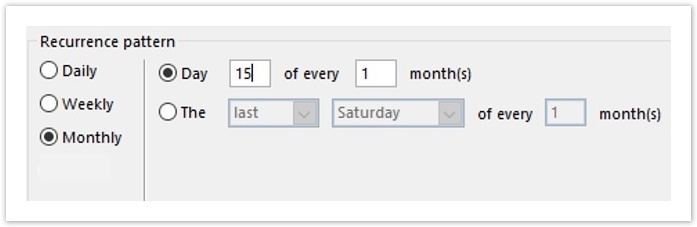
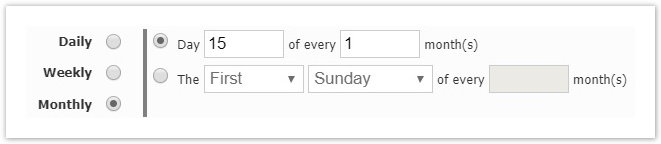
- Monthly (Range is: 1-31 for days & 1-12 for months): The repetition can be configured based on a Monthly pattern, i.e. the fifteenth (15th) day of each month. The default values for "Day" are the fifteenth of each month and for "The" the default values are the first Sunday of every month.
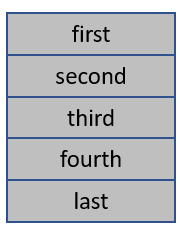
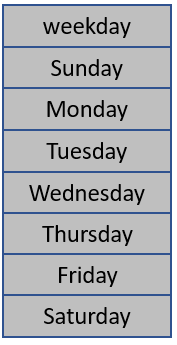
Monthly options on the second radio button:
- Daily (Range is: 1-31): The repetition can be configured based on a daily pattern, i.e. once every day. The default value is one day.
- Range of Recurrence: This section of the scheduler dictates when and for how long the Recurrence Pattern will occur.
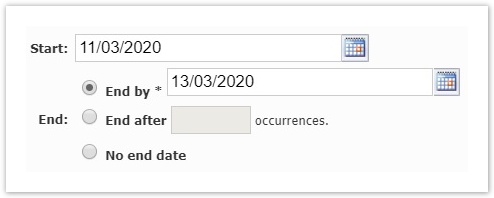
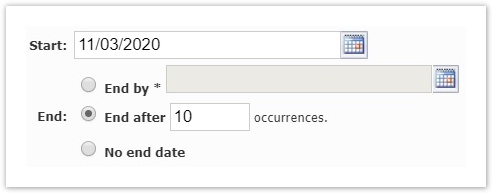
- Start: The starting date the scheduler will begin the repetition of the report's automatic creation. By default the date will be today. However, you can update it to be any date from today, onward. Please note, that the start date must never be earlier than the today's date.
- End: The end period the scheduler will stop the repetition of the report's automatic creation. Once the Recurrence reaches its end period, the Report will stop be created and the Notification will not be sent. Plase note, that the end date must never be earlier than the start date.
- End by*(compulsory field): The end date the scheduler will stop. By default the date field is empty. Please note, that the end date must never be earlier than the start date.
- End After: The number of occurrences after which the scheduler will stop. By default the value 10 will be displayed but you can define any natural numbers ranging from 1 to 100.
- No End Date: This field indicates that the repetition will have no end period and therefor therefore will continue forever.
- Dispatch Method: This section of the scheduler mandates the email(s) where the report's results will be sent to via Notification email(s).
- Send Results(checkbox): This option enables or disables the dispatching of emails to the defined email address(es). If the checkbox is not enabled, the report will be created based on the automatic schedule but it will not be sent via a Notification email.
- Email(s): Please write in this field one or more email addresses that you wish the report results to be sent to. To separate more than one emails, please use the semi-colon symbol ( ; ).
- Email(s): Please write in this field one or more email addresses that you wish the report results to be sent to. To separate more than one emails, please use the semi-colon symbol ( ; ).
Rw ui textbox macro type tip In the event that you have chosen to keep disabled the Send Results option and not receive automatically (via notification emails) the scheduled reports, those generated reports will be saved in a folder and can be reached and downloaded by accessing the View History component of the scheduler, which is analyzed in the following section of the page.
- Report Options: This section of the scheduler is where you provide the report's basic required information such as the report's name and file format, as analyzed below.
After you have configured all four sections of a "Report Scheduler" you can click Apply at the bottom of the pop-up window for your configuration to take effect.
Managing the Execution of a Scheduled Report
In this section of the page, we analyze the identification of a scheduled report, the re-activation of a scheduler and the scheduler's component that stores the automatically generated reports, named View History.
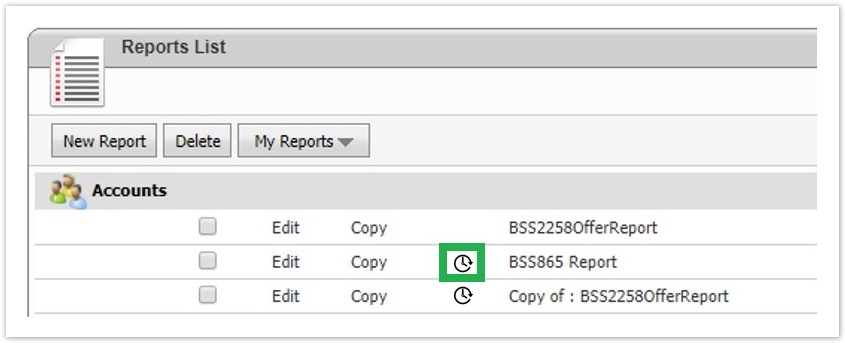
Identify a Scheduler
An easy way to know for which report a schedule has been set is via the ![]() icon that appears only next to reports with a saved schedule, inside the Reports List. The icon will appear once a scheduler has been set (created and saved) on a report. Also, by hovering over the
icon that appears only next to reports with a saved schedule, inside the Reports List. The icon will appear once a scheduler has been set (created and saved) on a report. Also, by hovering over the ![]() icon, the message "A scheduling service has been set" appears. The icon will be displayed even if you have reached the end date of the report's schedule. In the event that you have disabled the scheduler, the icon will be grayed out.
icon, the message "A scheduling service has been set" appears. The icon will be displayed even if you have reached the end date of the report's schedule. In the event that you have disabled the scheduler, the icon will be grayed out.
Deactivation of Scheduler
If you wish to deactivate a scheduler, all you have to do is edit the scheduled report by clicking the Edit, then click on the Report Scheduler button from the report's menu and lastly click the  button which will immediately turn into
  . By doing so, the deactivation is instant and the automatically generated reports will stop being generated from this point forward.
Reactivation of Scheduler
If a schedule has reached its end date (thus no report is being created anymore) in order for you to re-activate it you are able to update the start and end dates and click on "Apply". So, there is no need to use the "Enabled/ Disabled" toggle button in this case.
To re-activate a deactivated scheduler, by clicking on the "Enabled/ Disabled" toggle button, all the fields will display the values they had before the de-activation or contain the edited values if you have edited them after the scheduler's deactivation, since edit is supported in both states (Enabled & Disabled). The change is considered immediate.
Accessing the Report's Execution Component
| Anchor | ||||
|---|---|---|---|---|
|
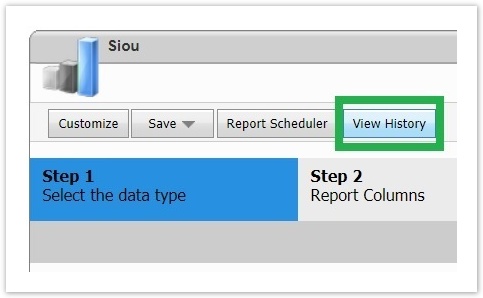
A custom action (button) will be present next to the "Report Scheduler" button, named View History. The button becomes enabled, once the first report is generated by the scheduler. If a report is not planned for automatic execution at all or the execution is planned in the future, the button will be grayed out.
Once the button is enabled and clicked, a pop-up window will be displayed having a list with all the scheduler's executions, their statuses and their log, as well as the "Download" option for downloading any automatically generated report from the scheduler, as depicted below:
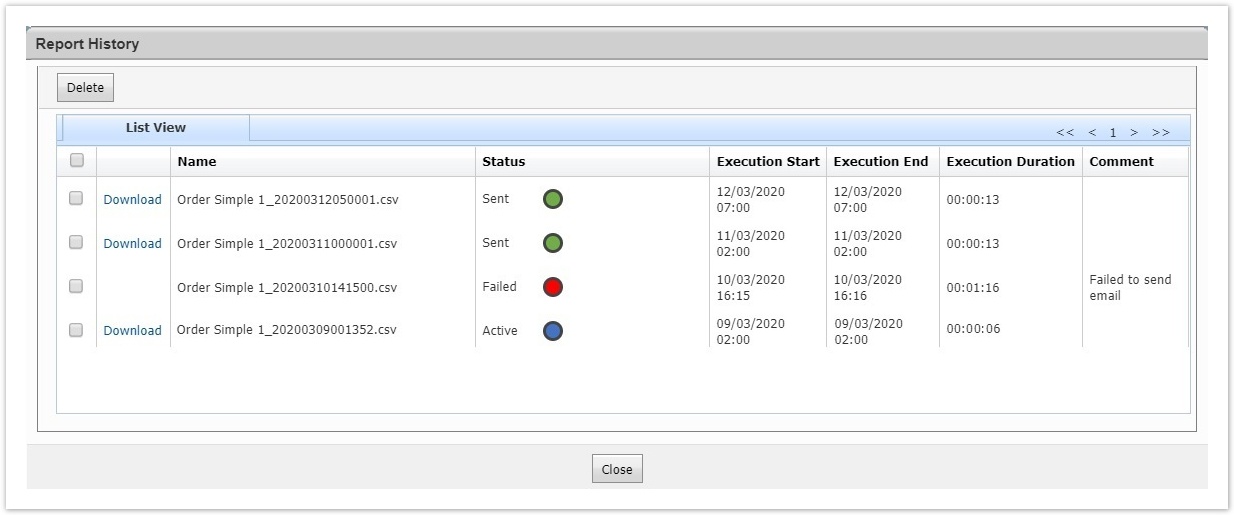
This list works as an execution log. It displays details regarding each execution and its results (if available). The log contains information regarding the automatic creation of a report and whether or not it was sent via a notification email. More specifically:
Download (column): Under this column you can download the automatically generated reports by the scheduler. If a Report fails to be created, the "Download" link will not be displayed.
| rw-ui-textbox-macro | ||
|---|---|---|
| ||
View History - Folder Space and Location of Saved Reports Since one of the uses of the View History is to store the automatically generated reports of the scheduler, the below information concern the folder in which the aforementioned reports are being stored, depending on the type of installation you possess.
| ||
| Ui text box | size | medium|
| -macro | ||
| ||
View History - Folder Space and Location of Saved Reports Since one of the uses of the View History is to store the automatically generated reports of the scheduler, the below information concern the folder in which the aforementioned reports are being stored, depending on the type of installation you possess.
|
Name: Each Report scheduled for automatic execution will be saved with the name you have provided in the pop-up window and the time stamp. The report's timestamp contains the exact date/time during which the execution of the report has finished. For example, a Report for "ESD Assets_19112019090701" has a time stamp which contains: DD-MM-YYYY-HH:MM:SS:MsMsMs and it will be calculated based on UTC timezone.
Status: The status indicator of whether the report was sent, is being sent or it has failed.
- Active: The report was created via the "Report Scheduler" action but you have not selected to dispatch the results via a notification email, so the reports are stored here.
- Sent: The report was created via the "Report Scheduler" action and since you have selected to dispatch the results via a notification email, the notification has been sent from our system.
- Failed: The report either failed to be created or it failed to be sent. Either way, the specific comment will clarify the cause of failure.
Execution Start: The time stamp of the execution's beginning. Its calculation is based on the BSS user's timezone.
Execution End: The time stamp of the execution's ending. Its calculation is based on the BSS user's timezone.
Execution Duration: The total duration of the execution.
Comments: The comments will be displayed on the "Comments" column only in case of failure. The comments here will not be as technical as the logs inside the Setup.
| rw-ui-texttextbox-boxmacro | ||||
|---|---|---|---|---|
| ||||
Please note that each time an error occurs during code execution, a log will be created inside the Setup. However, on the "Comments" column we will display more meaningful comments rather than technical ones. |
The only button available will be the ![]() "Delete" button and by selecting each report, you are able to delete one or more reports (via the list's check-boxes) in order to clear some space.
"Delete" button and by selecting each report, you are able to delete one or more reports (via the list's check-boxes) in order to clear some space.
| rw-ui-texttextbox-boxmacro | ||||
|---|---|---|---|---|
| ||||
What Happens if I Update a Report? If for an existing report a scheduler has been set, once the changes are saved, the next report created by the scheduler will contain your changes. What Happens if I Copy a Report? If you create a copy of an existing report via "Copy", the scheduler and history of the original report is not copied. You will have to create a scheduler pattern from scratch. What Happens to the "View History" if I Deactivate a Scheduler? The "View History" component of the scheduler will not be affected and will still be active as well as retain all the information that had already stored, such as the log and the reports, up this point. |
| rw-ui-texttextbox-boxmacro | ||||
|---|---|---|---|---|
| ||||
Which Changes Require a Restart of the Scheduler Service in order to be Applied? The changes that require a restart of the Scheduler Service are:
This means that if you update the pattern of the report's execution (e.g. from daily to weekly) this change will not be considered immediate , but will take place the next time that the service restarts. So, a report is executed before the restart, the pattern that will be followed is the old one and not the updated one. On the other hand, if you change the file name, the next time that the report is created, it will include the new name. What Happens if you Delete all the Entries from the View History List? The deletion of all the entries from the View History list, will mislead the Scheduler into thinking that there was a misfire so by the next time it will restart, it will re-create the deleted reports, once. However, after this execution, the scheduler will proceed working normally. |
Notification Email with Attached Report
A system notification email will be dispatched each time a report is generated , when the Send Results checkbox option is enabled.
| rw-ui-text-box | size | medium|
|---|---|---|
| textbox-macro | ||
| ||
Non-editable Email Please note that the email template utilized for dispatching the emails with the attached report, is not editable and will not contain a signature at the end of the message with the organization's name. |
This notification email will be dispatched immediately after the report is created via the scheduler. We will not have to wait for the Notification Service to run. For example, a report is completed on 03:15 a.m. and that's when the notification will be sent to its respective recipients.
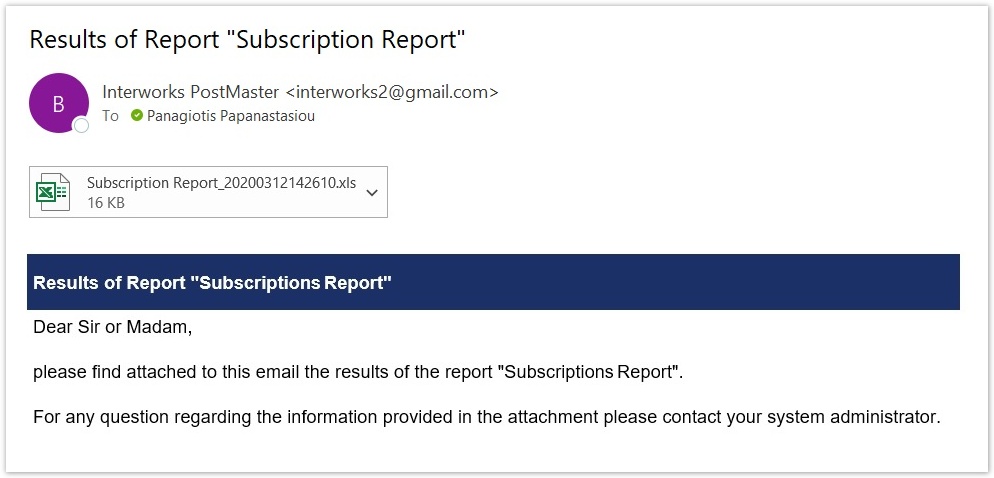
Inside the notification email you will find in the message the report's actual name within quotes (as illustrated with the image above), as well as the attached report.
If you have created multiple schedulers on multiple reports, having the "Send Results" option enabled, a notification email will be sent for each one of those reports, having attached the corresponding report.
If the scheduler has gathered from the Billing Service all the data up until 05:00 A.M. then the reports which are later than 05:00 A.M. will not be handled during that day, meaning that a report will be generated having gather gathered all data from the Billing Serice up until 05:00 A.M. but no later.
| rw-ui-texttextbox-boxmacro | ||||||
|---|---|---|---|---|---|---|
| ||||||
When does the Scheduler Generate and Dispatch the Notification Email(s)? The time on which the Scheduler Service will generate and dispatch the auto-generated reports depends on the type of installation you possess(On Cloud or On Premise).
Also, a restart of the Scheduler Service usually happens once every day (24h), depending on the type of your installation, which means that during that period any auto-generated report that was scheduled to be dispatched during the period (before the restart) wasn't generated, it will be generated and dispatched after the restart of the service. The time that the Scheduler Service restarts is configurable based on the type of installation you possess. Overall, the execution process is very efficient, even during the generation of bigger reports alongside other running tasks. "Misfires" of Scheduler Service & Handling There are cases where the Scheduler Service could misfire, meaning that an auto-generated report will not be generated and dispatched, since the execution process didn't happen at all. Please note here that a misfire is not a case of a report with "failed" Status as the ones found in side the Report History list. Ιf the Scheduler Service finds a case of misfire, it will execute the report the next time it restarts. So in this case, the 05:00 A.M. run is not applied as the report will be executed the next time the Scheduler Service restarts which depends on the type of your installation. A case of misfire is only executed once. So, if many executions did not happen in series, when the scheduler finds these cases, only one execution will be performed to cover the lost ones. |
Errors - Warnings - Limitations
In this section of the page, you will find an analysis of the possible errors, warnings and limitation limitations that might occur during the overall scheduler's automatic execution of reports and dispatching of emails. Handling of the errors as well as explanations and solutions are provided throughout this analysis.
Recurrence Pattern- Errors
- Almost all Report Scheduler fields have specific restrictions, especially when you provide a value that is not valid for a specific Recurrence Pattern, or you left a field empty that is supposed to be filled in. To indicate an error, the problematic fields will be displayed in red highlight.
Therefore, in order to avoid errors that are instantiated due to invalid values, please utilize the following two guides:- For the Daily radio button, the Every field's options range from 1 to 31 days.
- For the Monthly radio button, the Day field's options range from 1 to 31 days and the Month(s) field's options range from 1 to 12 months.
- For the Daily radio button, the Every field's options range from 1 to 31 days.
A case of warning could appear when you will want the report to be created at the end of each month. Since not every month has the same number of days, If the number defined is either 29 or 30 or 31, on "Apply", the Results pop-up will be displayed with the message:
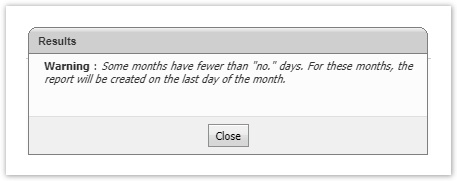
"Warning: Some months have fewer than "no." days. For these months, the report will be created on the last day of the month." The "no." is the number of days provided by you (29,30,31).If you have defined the report to be created on day 29 of each Month starting from January, the reports per month will be created on this basis: January - Report Creation February - Report Creation March - Report Creation April - Report Creation 29/01/YYYY 28/02/YYYY 29/03/YYYY 29/04/YYYY If you have defined the report to be created on day 31 of each Month starting from January, the reports per month will be created on this basis: January - Report Creation February - Report Creation March - Report Creation April - Report Creation 31/01/YYYY 28/02/YYYY 31/03/YYYY 30/04/YYYY Once you click on the "Close" button of the "Results" pop-up window, the "Report Scheduler" pop-up window will not be displayed again as the value defined is a valid number and no more selections need to be made.
Range of Recurrence - Errors
- Most errors that appear during the configuration of the "Range of Recurrence" are related to wrong dates. To avoid them, do the following:
- The "Start" date, should be filled in with the today’s date or a later date.
- The "End" date, cannot be empty or earlier than the "Start" date.
- On "End after ... occurrences" you should populate the field only with a normal number ranging from 1 to 100, to avoid any errors.
View History - Errors
Within the View History page, the Comments column, upon indicating an Error by having a "Failed" Status, it will display one of the following comments, depending on the situation:
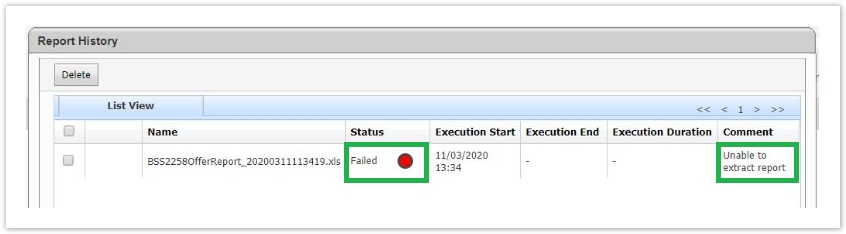
- "Unable to extract report": We were not able to extract the data from the database for this specific report.
- This could happen if an error occurs on the report itself (an error occurred on Step 5 of the report's creation e.g. by not selecting specific columns).
- Also, this could happen if the report is empty (no data were found due to e.g. specific criteria added).
- Download link is not displayed next to this execution.
- "Failed to create export file": We were able to retrieve the data from the database but the excel failed to be created (e.g. more rows than the excel's limit).
- Download link is not displayed next to this execution.
- "An error occurred": This comment is displayed if an error occurs for whichever reason that cannot be defined and it is not relevant to the other categories.
- Download link is not displayed next to this execution.
- "Failed to send email": This happens if the report is created by the scheduler but it wasn't able to send an email to all recipients.
- Download link is available in this case as the report is created.
Therefore, the Download link of an auto-generated report is displayed always even in the case that a report failed to be sent via a notification email. The only time that the Download link will not be displayed is when a report was not created.
Email Dispatching - Errors
If you have chosen to add more than one recipients to receive the notification email along with the attached auto-generated report, please note that there might be cases where the email might reach for example two out of three recipients. The View History page will indicate the Status as "Sent" and not failed since there is no way of knowing, via the notifications, to whom the email was sent successfully or not.
Limitation of Scheduler's Automatically Generated Reports
When you have received a notification email along with the attached report from the Scheduler, you are able to open and view the attached (exported excel) report. However, there are some limitation limitations to those reports that are addressed below.
- The first row of the exported excel will have the format of a header.
- The columns that contain values will be of type "General", in excel terms.
- All boolean fields are converted to "yes/no" on the exported excel.
- If a field has null values (regardless of the type), then this field is displayed empty on the excel regardless of how it is filtered in the UI.
- If a column is displayed on the UI but it is not available as a selected column on step 2 (of the report's creation) then this column and its data will be displayed in excel but with an empty name on columns name.
- The grouping of data is not supported from by the scheduler. So even if a report is grouped on the UI, when it is created by the Scheduler, no grouping is applied.
- The re-ordering of columns is not supported from by the scheduler.
- Graphs are not supported from by the scheduler.
- Pivot tables are not supported from by the scheduler.
Table of Contents
| Table of Contents | ||
|---|---|---|
|