Importing/Updating Adobe Products & Prices to BSS OLD 4
- Panagiotis Papanastasiou
In the interworks.cloud platform, you can import the Adobe products under the "Adobe Services" Product Type, by utilizing the Product Importer.
Importing the Adobe Products and Base Prices in the BSS Platform
The first step is to manually import the Adobe products and their base prices to the BSS platform. For doing this, one must initiate the import of the Adobe products catalog by utilizing the Excel file that is issued to all the distributors of Adobe each month.
Downloading the Official Adobe Excel File Containing Products & Base Prices
Each distributor has his own set of SKUs & prices that he sells from Adobe, which can be found in the Excel spreadsheet that can be downloaded from the "Adobe Partner Portal".
You have to log in with your credentials as a Distributor, and then you can download the Excel with the products and the prices from the indicated section:
The Excel file contains the distributor’s cost & sell base prices with no margin or markup included.
Once you acquire a copy of Adobe's official Excel file, which contains the list of the products along with their pricing, you need to prepare the Excel file, by following the steps that follow below.
Preparing the Excel File for Each Unique Product
The first step of editing the Excel file, is first to open it and create a filter for the whole Excel file, by selecting the whole table of the file and clicking on the Data tab while selecting the Filter option. By doing that, you will be helped later on during the following preparation steps.
For the second step, once the filter is placed on the Excel file, you need to add two new columns, named Concatenated SKU (1) and Concatenated Product Name (2):

- Concatenated SKU: This new column must contain the different codes (representing the respective levels) of each unique SKU.
- Since we have no automated way to make this distinction, this responsibility lies upon the BSS user.
The distributor must identify each unique product and its levels by taking into consideration the following excel columns; Product Family, Language, and Level detail (marked values in yellow color):
 The screenshot is taken before the addition of the two new columns.
Once each unique product is found, the BSS user must add to the Concatenated SKU column their concatenated values, separated by a comma “,”. The concatenation formula for this column, after its creation, is the following: =CONCATENATE(I2;",";I3;",";I4;",";I5) where I stands for the column with the Part Number. The formula numbers next to the letters correspond to the number of the row. You can change the formula respectively so that the letters and numbers match the respective columns.
 The screenshot is taken before the addition of the two new columns.
The final Concatenated SKU column must look like the following screenshot.

The screenshot is taken after the addition of the two new columns.
- Since we have no automated way to make this distinction, this responsibility lies upon the BSS user.
- Concatenated Product Name: This new column must contain the combinations of the Product Family names and the Additional Detail names where the former indicates the TLP MIGRATION products and the INTRO FYF offer products.
- Since we have no automated way to make this distinction, this responsibility lies upon the BSS user.
The distributor must filter the Additional Detail column (marked values in yellow color) only for the products TLP MIGRATION and INTRO FYF, by clicking on the Additional Detail column drop-down filter (arrow) and selecting the two aforementioned product descriptions and then clicking on the OK button.
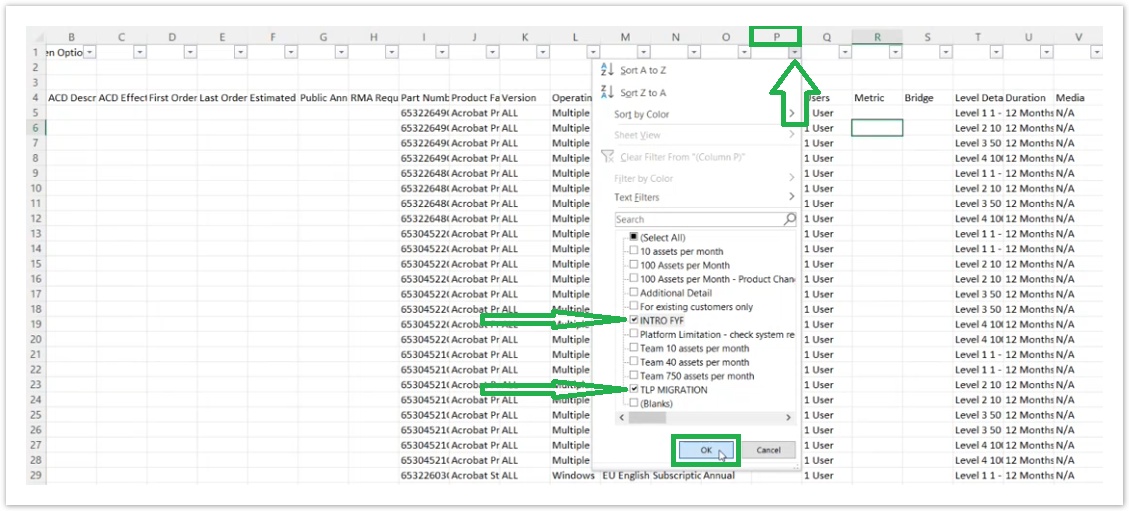 The screenshot is taken before the addition of the two new columns.
Once the list is filtered for each unique product combination, the BSS user will need to first copy all those filtered results from all the columns and rows and paste them exactly at the end of the list.

After pasting the filtered results exactly below the filterest list, and since the filtered results skip rows in the Excel file, the BSS user must now be extra careful in manually deleting the initial filtered results (blue-colored numbers) line by line without affecting the in-between non-filtered rows or the copied ones.
Once the careful deletion of the rows with the blue-colored numbers is complete, the BSS user needs to click on the Additional Detail column drop-down filter (arrow) and remove the filter by selecting the (Select All) checkbox option. If everything was done correctly, the non-filtered results and the copied filtered results must be displayed on the Excel spreadsheet, and no blank rows must be present within those data. If there are blank rows between the rows, please carefully delete them.
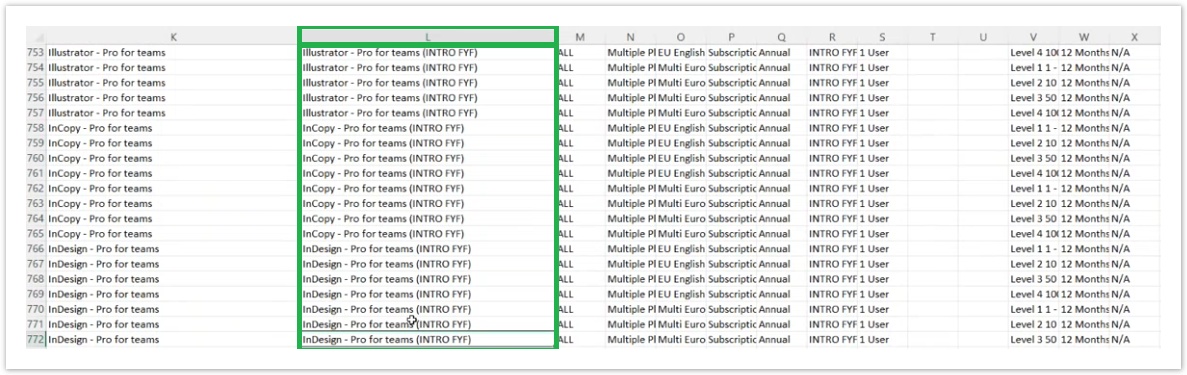
When all the above steps are completed, the BSS user must add to the Concatenated Product Name column their concatenated values, separated by a comma “,”. The concatenation formula for this column, after its creation, is the following: =CONCATENATE(K2;" ";"(";R2;")") where K stands for the column with the Product Family names and R stands for the column with the Additional Detail names. The formula numbers next to the letters correspond to the number of the row. You can change the formula respectively so that the letters and numbers match the respective columns.
 The screenshot is taken before the addition of the two new columns.
The final Concatenated Product Name column must look like the following screenshot.
The screenshot is taken after the addition of the two new columns.
- Since we have no automated way to make this distinction, this responsibility lies upon the BSS user.
The third step of the Excel file preparation, is to add a new column named Primary/Addon.
For each row of the excel file containing a product, you have to populate each field with the boolean value of "1" in order for the Product Importer to import the products as add-ons in the BSS.
This action, of adding products as add-ons to the BSS platform, is performed due to how Adobe manages subscription cancellations.

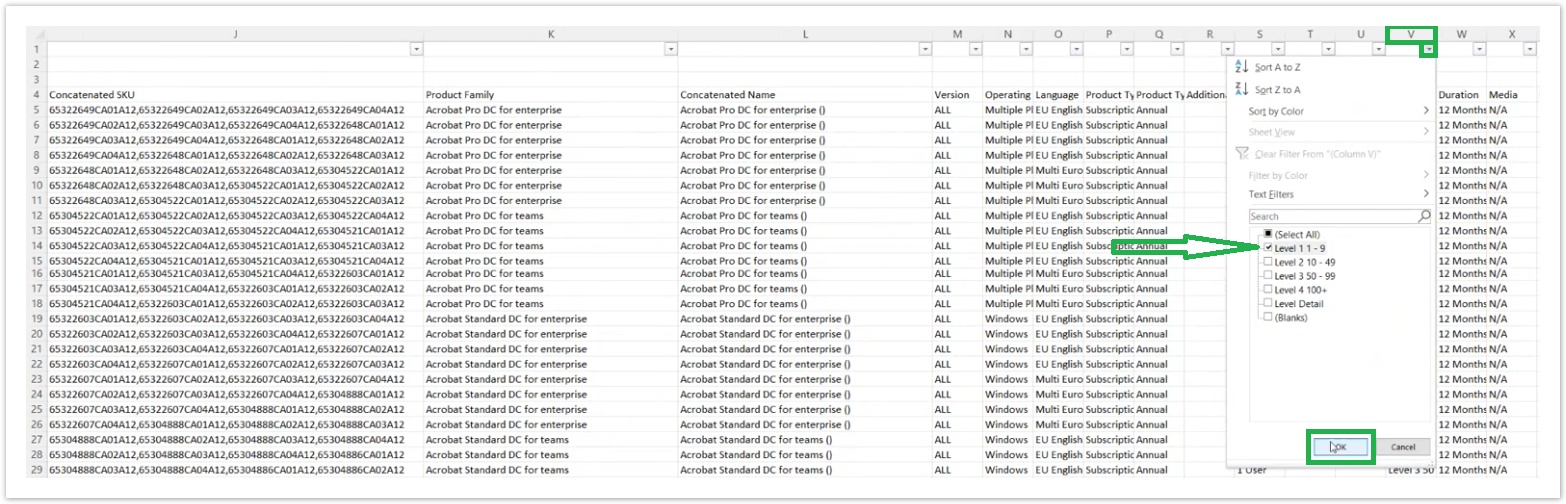
The fourth step is to filter the highest base price (Level 1 price) from the Level Detail column by clicking on the drop-down filter (arrow), selecting only the Level 1 option, and clicking on the OK button.
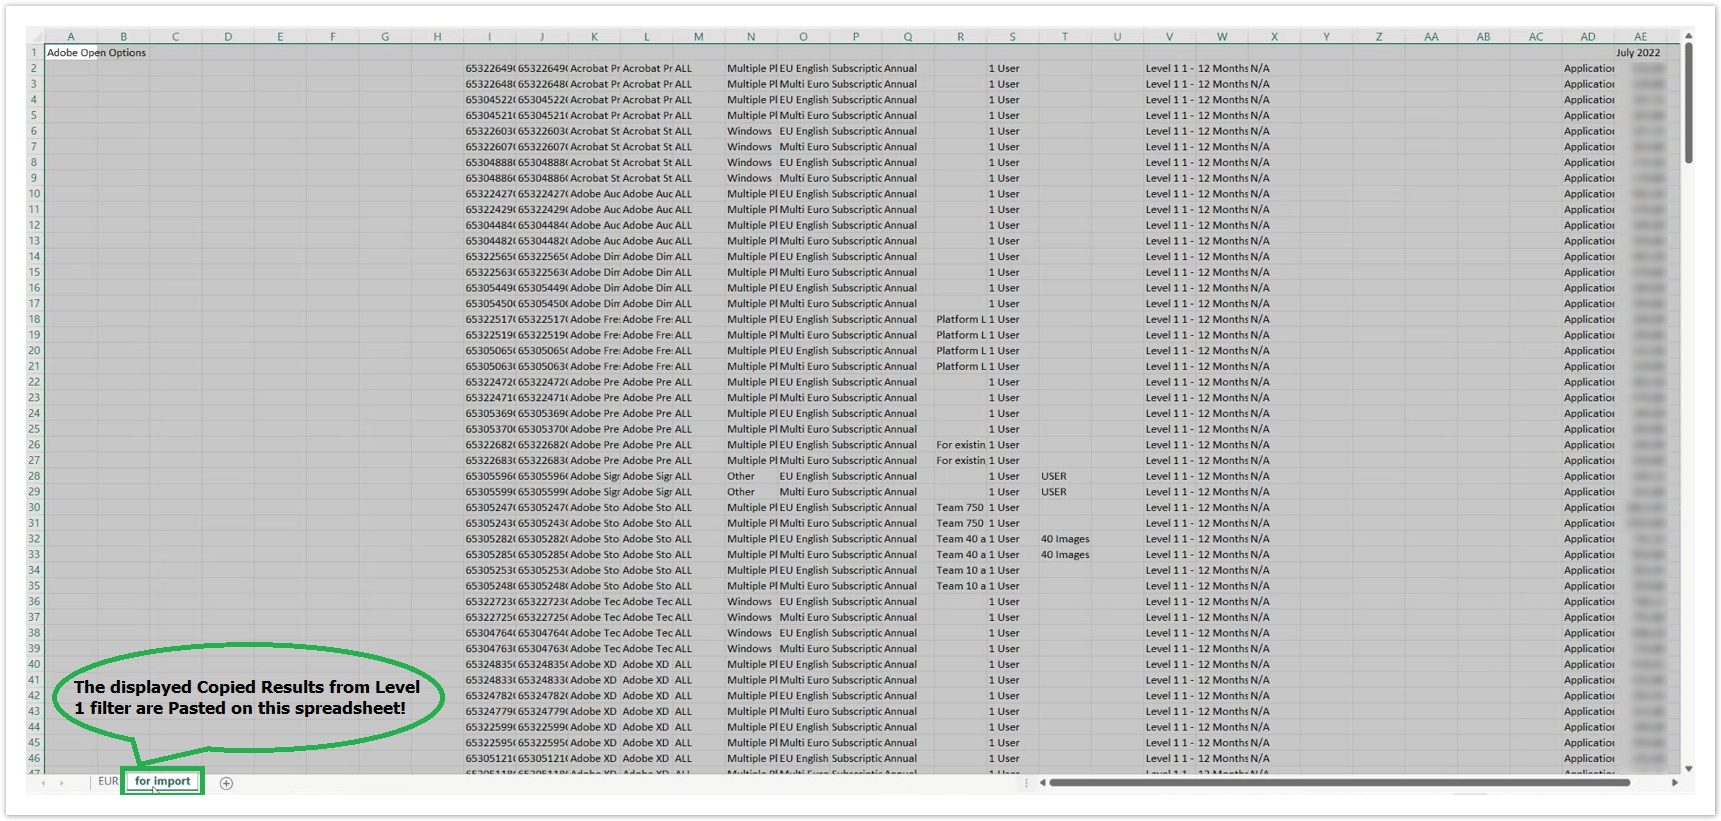
The fifth and final step is to copy the filtered list of results (along with the column titles) for the Level 1 Price and paste them onto a new Excel spreadsheet (next to the current one) and provide a new for that newly created sheet. This final Excel sheet must be uploaded onto the BSS platform for the Adobe Products to be updated in your catalog each month. The upload also provides the BSS platform with the default base prices (not the final prices) without applying any discount levels.
Final Excel Results
This is what the final form of a prepared Excel file for import looks like.

The following Excel file example named Adobe Products Example.xlsx has undergone such a preparation. The file has its prices removed for compliance reasons.
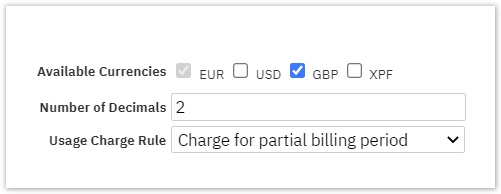
The specific currencies will not be automatically activated on all Adobe products without the BSS user having to perform this action manually. This action is done via the Products Importer, as analyzed below, because we expect the currencies to be enabled in the product, as shown below, but also provide a basic sell & cost price for this currency.
Import Process
Since the products of Adobe in our BSS platform are handled as add-ons, the respective base prices along with the products can be easily imported as follows:
Under the Billing > Products section on our BSS, click on the "Import" button and select "Import Products".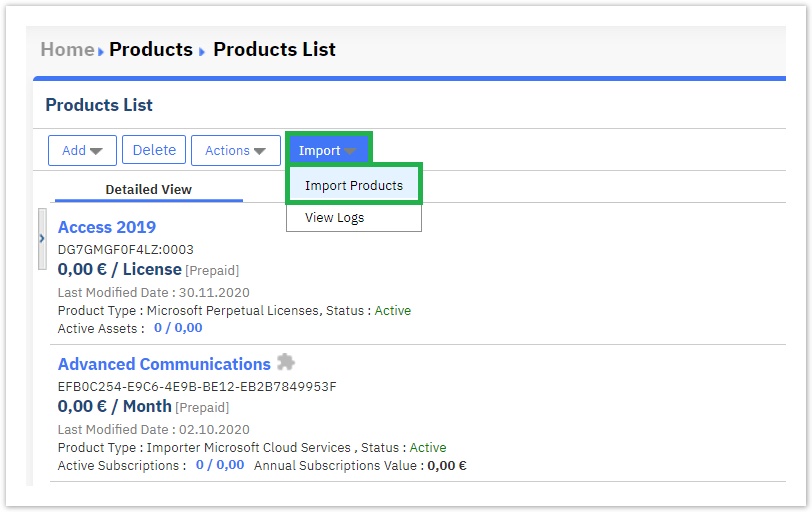
On the pop-up window, click on Browse and locate the latest Excel file containing the current Month's product prices.
Upon uploading the Excel sheet, under the first step of the import process, you select the values of the fields related to:
- The Excel Sheet (dist_vipmpc_<currency>_<monthYEAR>),
- The currency (Your Currency),
- The product type category (Common Product Type),
- The product type (Adobe Services),
- And the pricing type (Recurring charge - Prepaid), as illustrated in the following image.
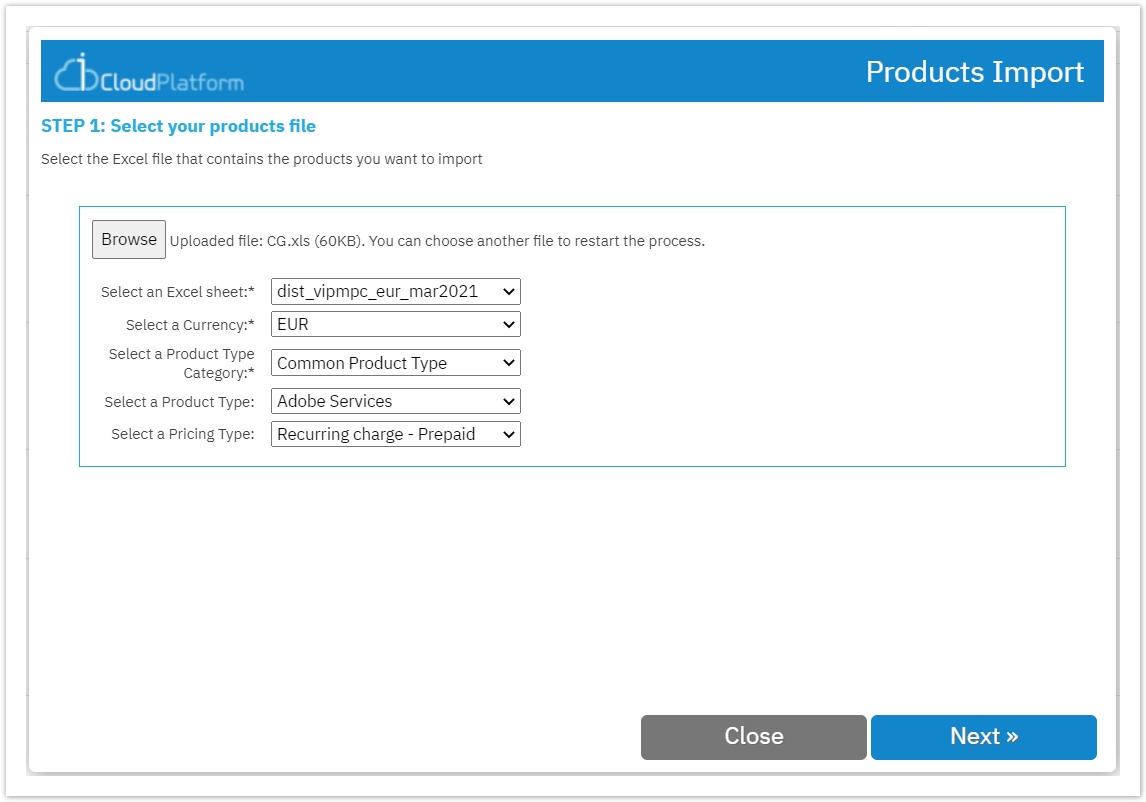
Click on the Next button to continue.
On the second step of the import process, you must match the columns of the Excel file with the target fields by creating a mapping.
Make sure that you populate the target field values as depicted in the following image.
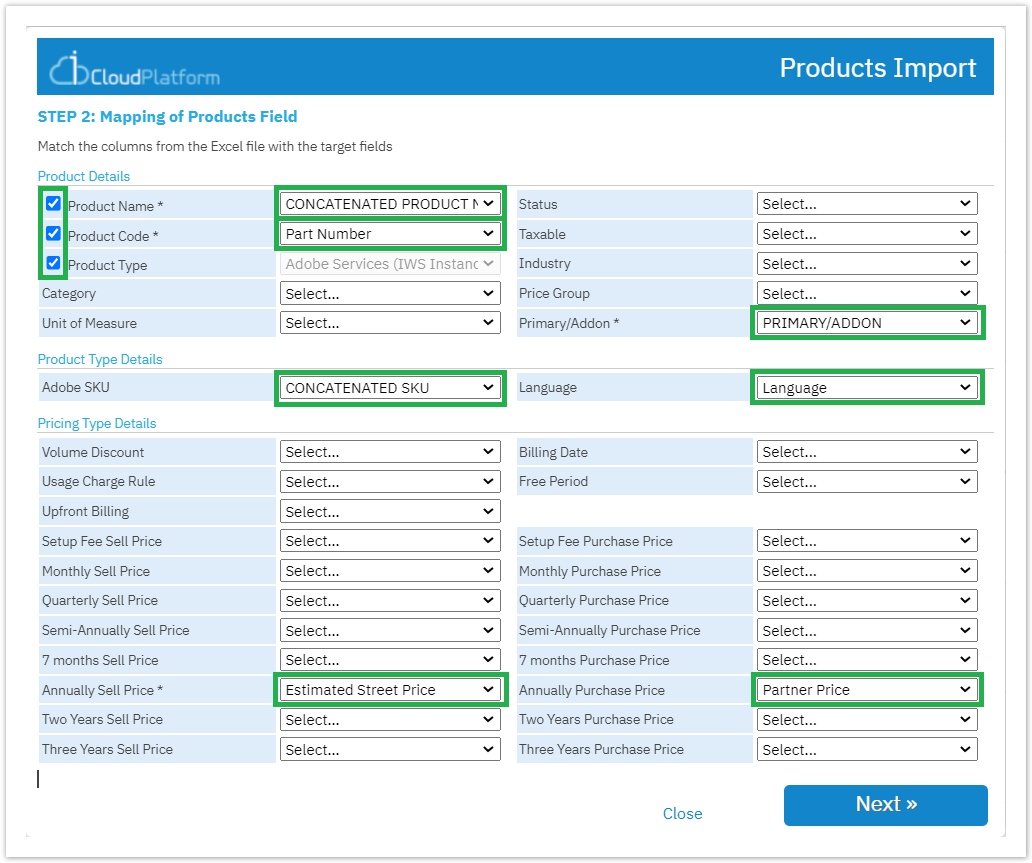
Click on the Next button after selecting the proper values for each target field.
On the third step of the import process, you are required to confirm the import by setting the "Responsible User" as well as the "Permission rule" based on which the process will be initiated.
Lastly, after finishing the import, inside the import report page, click on Close.
After the import, you will be able to see the added products having all the relevant base prices.
Uploading Final Prices
For uploading the final prices, containing official Adobe discounts, into our system, please check the guide on the Adobe VIP MP Volume Discount OLD 4 page.
Updating the Adobe Products and Prices in the BSS Platform
The update of the Adobe products and prices will happen again via both the Product Importer tool and the Adobe service manager instance Pricing file field.
- If prices have changed, by matching the respective excel column with the annual cost & sell prices, the BSS add-on prices will be updated to the new values during the import via the Product Importer tool, but the final prices will be dictated to our systems by uploading the latest official Adobe Excel file inside the Pricing file field located under each Adobe VIP MP service manager instance, and then saving the instance after the upload.
- If new products are added, the Importer will create them as expected since no match will be found with the existing BSS add-ons.
- If discontinued products are introduced, then this means that the update cannot handle that situation automatically. As a result, if a set of SKUs is no longer available in the Excel file, the Importer will not deactivate these add-ons automatically (or add the Discontinued status) in BSS.
You are responsible for cross-checking the previous Excel file with the new one to find any differences (regarding discontinued SKUs), and, accordingly, make the required manual changes in the BSS platform.
During the preparation of the update process, you need to use as identifiers the following two fields:
Product Code → Part Number
Product Type → Adobe Services
Assigning Add-ons to Adobe Product Container
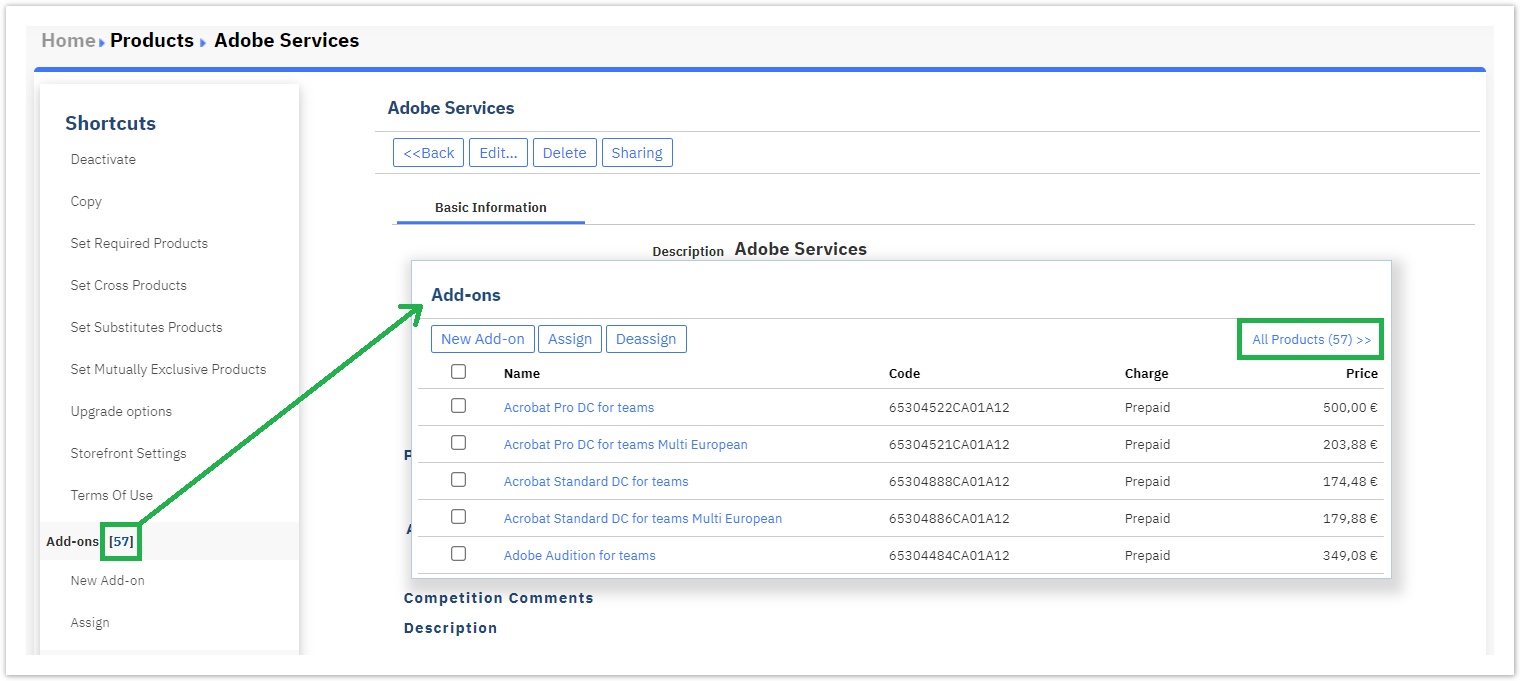
After the Import process has finished and the Adobe products along with their prices have been added to the BSS platform as Add-ons, you have to relate all those (57) add-ons to the "Adobe Services" container product. The container product is the mean for publishing the Adobe products to your Storefront and accepting orders via both platforms (BSS & Storefront). To proceed with the assignment of the add-ons to the Adobe container product, you first have to locate it. Navigate to BSS > Billing > Products and on the right-hand side of the Product's List page, you can utilize the Search option by filling in the name of the product "Adobe Services". Once the product is found, its product page is loaded automatically, and from there, you can click on the Add-ons option located under the Shortcuts menu.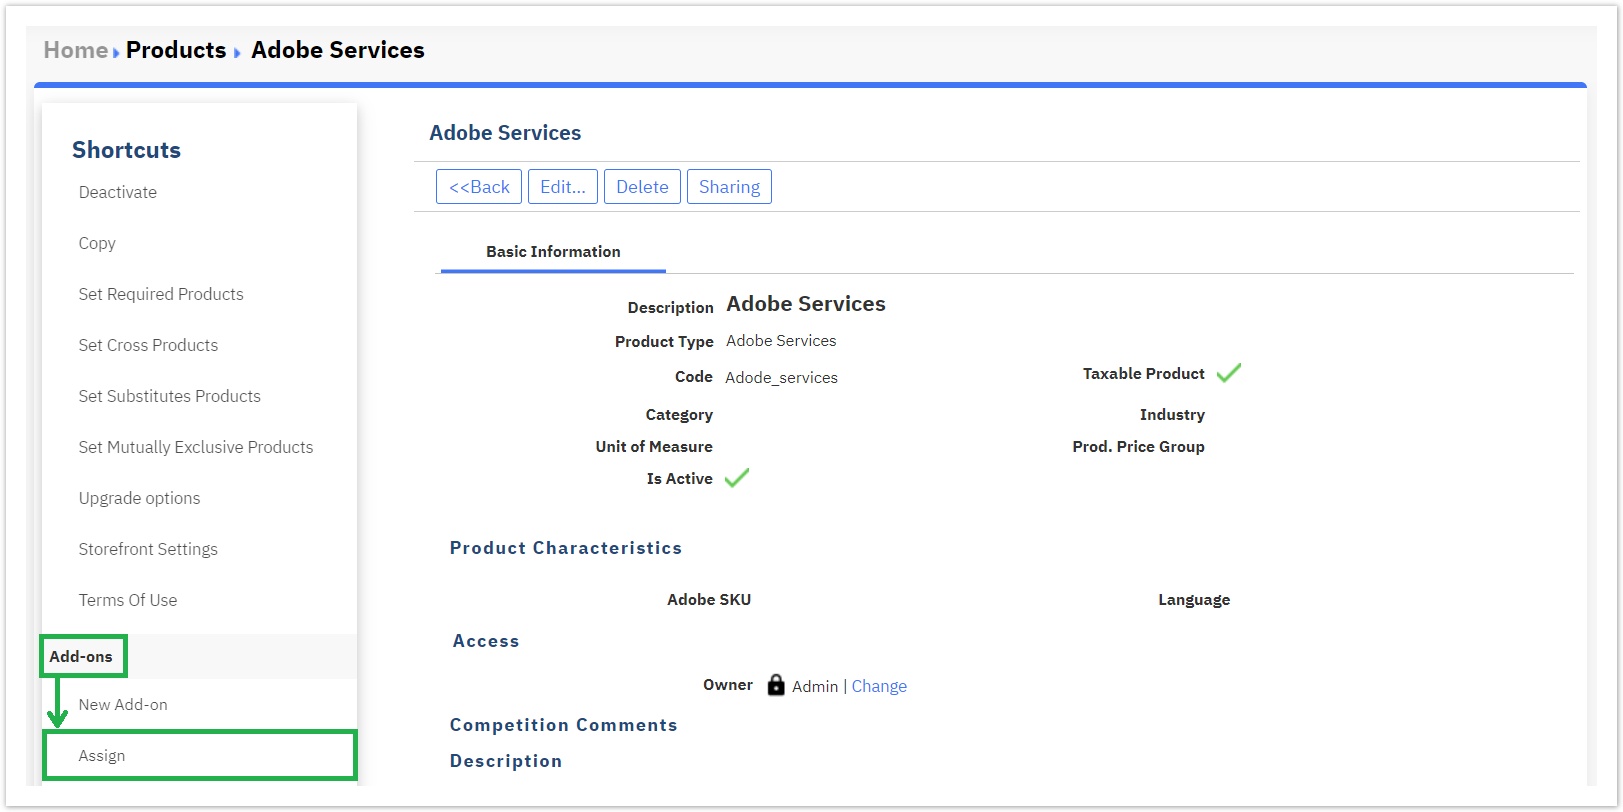
Then choose the Assign option in order to allocate all the relevant Adobe add-ons to this container product. Upon doing so, a pop-up window is displayed where it contains all 57 Adobe add-ons. 
By clicking on the upper left checkbox, and then clicking on the Add button, all the add-ons are successfully assigned to the "Adobe Services" container product.
Publishing the Adobe Product with the Add-ons in Storefront
You can publish in your Storefront the Adobe products(in the form of add-ons) under the Adobe container product called "Adobe Services".
First, make sure that each one of the 57 add-ons is published in Storefront. You can do that by gathering all the Adobe add-ons.
Please navigate to BSS > Billing > Products and from the products' list page, select the "Advanced Search..." option located on the right-hand side of the list.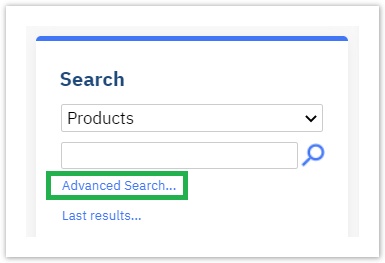
Afterwards, create the following two Advanced Search conditions:
- Field Name: "Is Add-on" - Operator: "is equal to" - Value: "Yes"
- Field Name: "Product Type" - Operator: "is equal to" - Value: "Adobe Services"

Click on the Search & Close button to initiate the search.
The results of the search will appear on the products' list where all the Adobe add-ons will be gathered.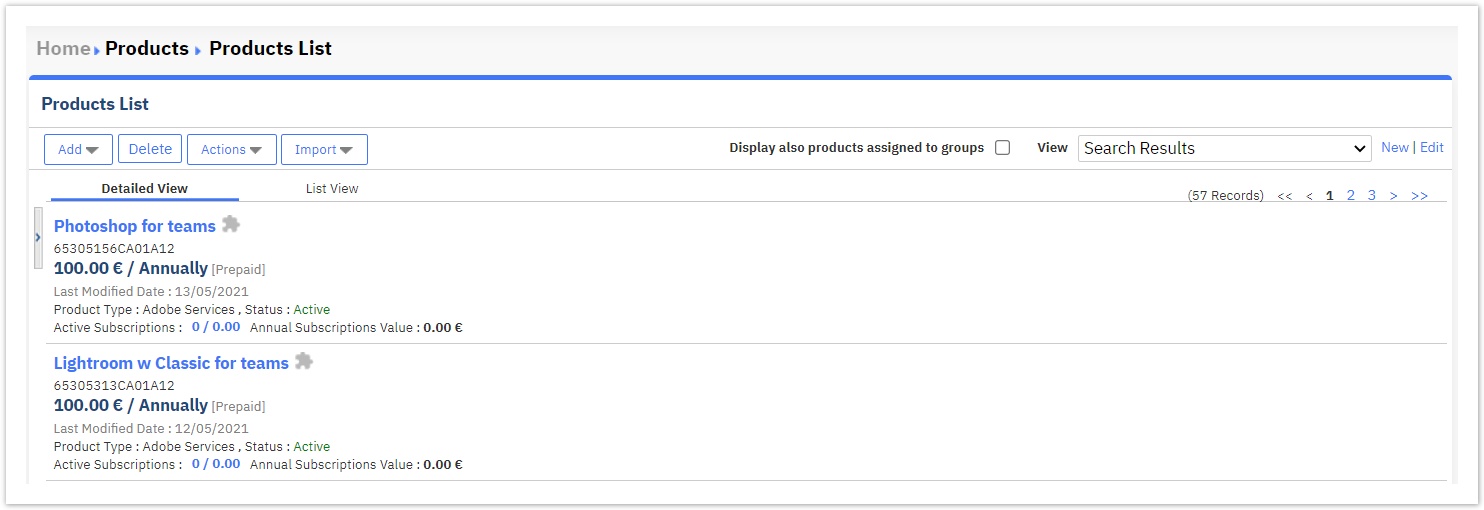
Now, all you have to do is open each Adobe add-on, click on the "Storefront Settings" option, and click on the checkbox "Publish to Storefront".

After publishing all the Adobe add-ons to Storefront, you have also to publish the Adobe container product in Storefront.
The method for configuring the Basic Storefront Settings of a product, is the same followed for any other product.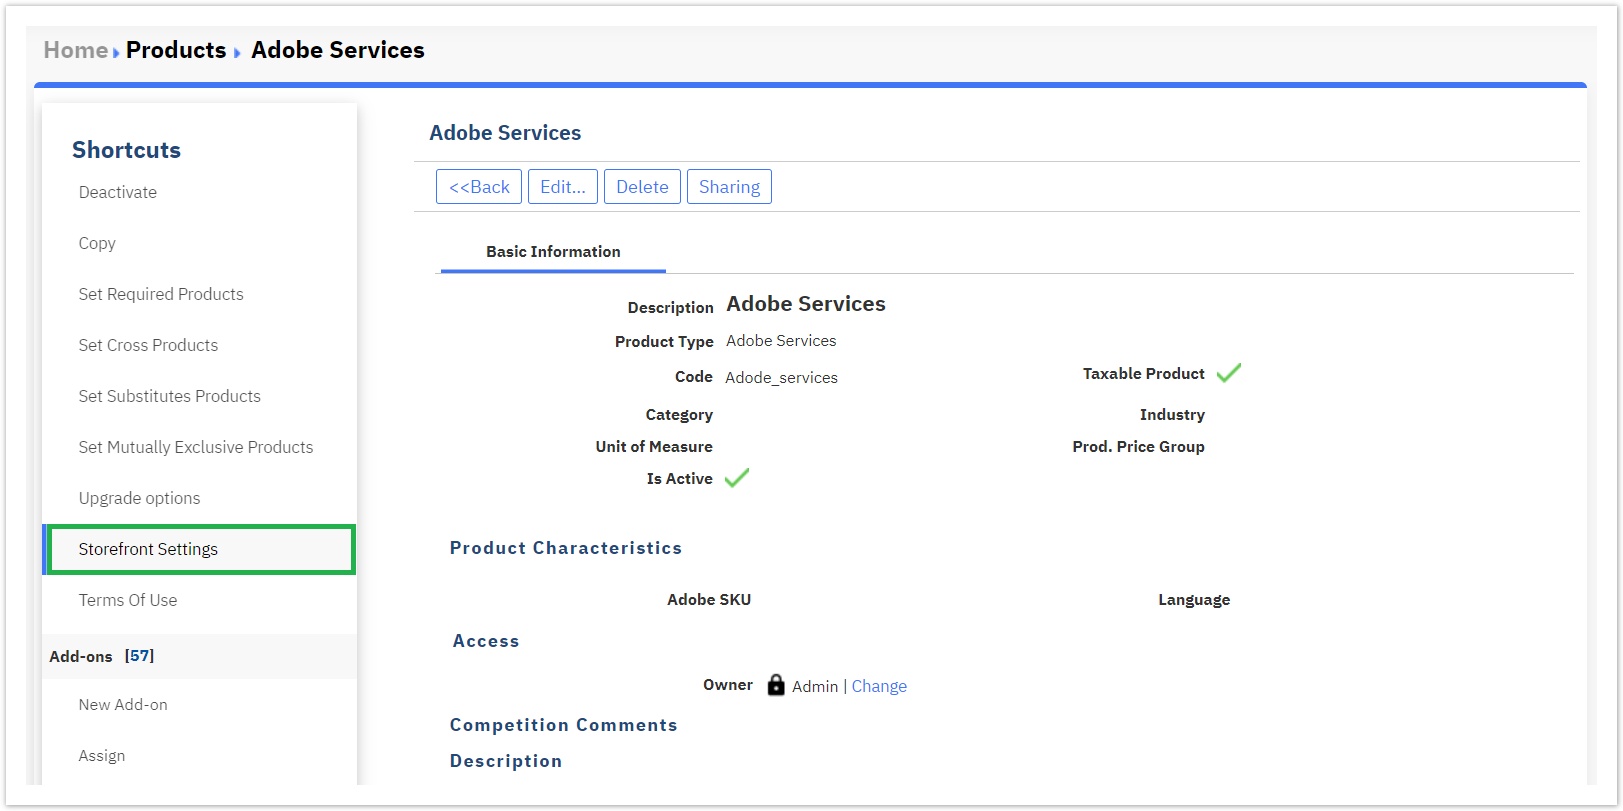
- To publish the Adobe Container Product to your Storefront, please follow the steps described on the page "Publish to Storefront Basic Options".
You can also check the page Define the Marketing Material of your Product for more details.