Versions Compared
Key
- This line was added.
- This line was removed.
- Formatting was changed.
| Excerpt |
|---|
This page contains information on the storefront account statement page. Here you can find how to enable the page, as well as a detailed overview of its features and contents. |
The Account Statement can be viewed in the Storefront. Customers can view all the transactions in a specified time period, or filtered by the type of their choice.
Making the Account Statement Page Available
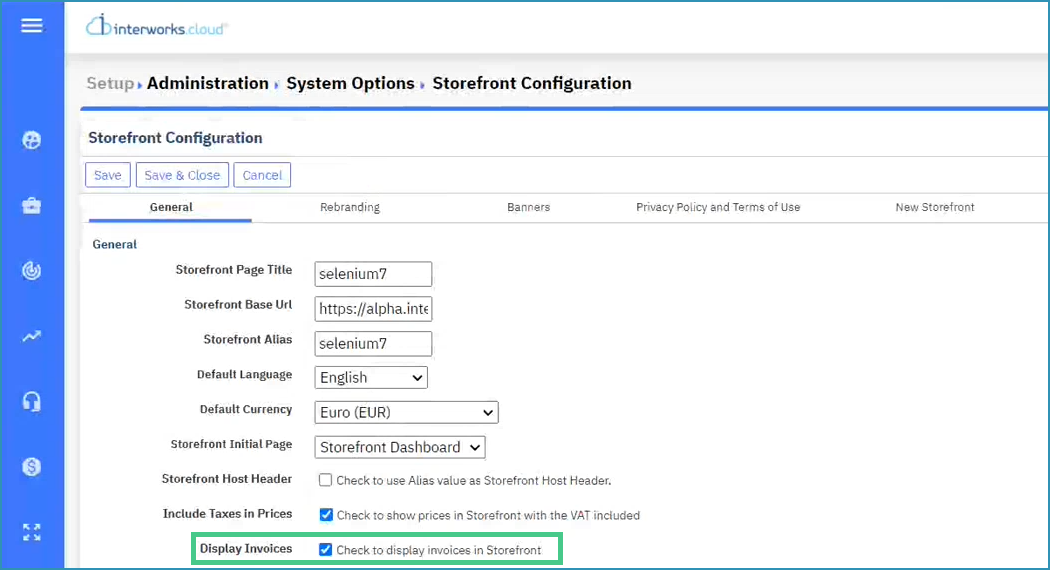
The prerequisite for viewing the Account Statement page is that the Display Invoices option is enabled in the BSS.To check this,go to Setup → Administration → System Options → Storefront Configuration, and enable Display Invoices.

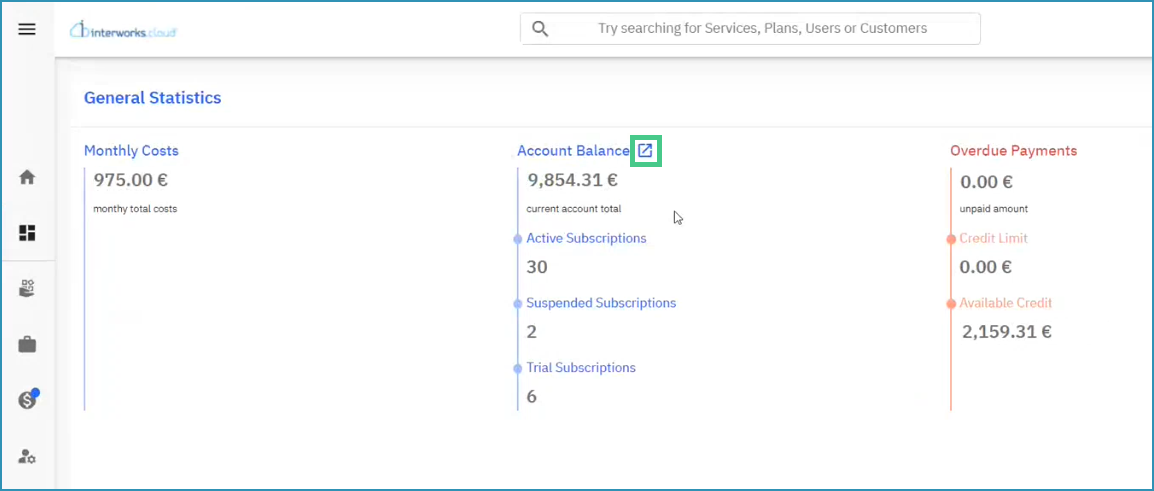
The Account Statement page can now be viewed either by selecting the launch icon in the General Statistics widget,

or by going to the Billing section and selecting Account Statement.

The Account Statement Page
The account statement page displays all the most recent transactions by default, in chronological order.

The totals are displayed only when All Transaction Types are selected, and are updated based on the selected time period.
Opening Balance is the balance of the account at the start of the selected time period.
Total Debit is the total amount debited from the account in the selected time period.
Total Credit is the total amount credited to the account in the selected time period.
| Note |
|---|
Please note that the Opening Balance, the Total Debit, and the Total Credit data are not being displayed inside the exported excel file. |
Filtering the Data
Select the Time Period drop-down menu to filter transactions by date.
The start and end dates for the specified period are displayed to on the right side of the menu.
You may filter transactions to those that occurredthe transactions with one of the following options:
This Month
Last Month
Last 3 Months
Or select Custom Range and specify Last 6 Months
This Year
Last Year
Custom Range → This option enables manually specifying the start and end dates in the corresponding fields manually.
| Note |
|---|
Please note that the custom range specified must be less than one year; otherwise, otherwise no data will be displayed. |
 Image Added
Additionally, filter the transactions by type, selecting one of the following:
Debit Invoices
Credit Invoices
Payments
Refunds
| Rw ui textbox macro | ||
|---|---|---|
| ||
Change of the Position of the “Transaction” & “Transaction Date” Columns of the ‘Account Statement’ TableVideo Discrepancies Post-Updates Please note that in the video above , the depiction of the “Transaction” and the “Transaction Date” is in reverse order, after the release of contains minor differences from the current platform version after the latest updates:
|
The Account Statement Table
The Account Statement contains the following columns:
Transaction Date - The date the transaction took place
Transaction - The type of transaction, and any additional information
Debit and credit invoices contain the invoice number
Refunds contain the reason, if applicable
Payments contain the Transaction ID
Debit - The debit amount, if applicable
Credit - The credit amount, if applicable
Transaction Balance - The resulting balance after the transaction
| Info |
|---|
Selecting the hyperlink in any of the Debit or Credit Invoice entries takes you to the invoice view. |
Export the current data to Excel by selecting the Excel icon. The Excel file will be titled with the time period of the exported data, and will have the same layout as the account statement:

Table of Contents
| Table of Contents |
|---|